Showing posts with label wehago designs facebook. Show all posts

Friday, 10 June 2016

Ready, Set, Sew! Winter Mystery quilt along!

The time has arrived to reveal the first clue!  Hope you are ready!  If you missed the first blog post with the requirements you can find it here.
Ready? Set? GO!

For this weeks clue you will need just your background and your dark fabrics which you have chosen.  So let's begin!

My colour selection - answered

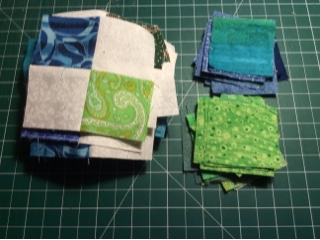
I decided I wanted a bit of variety in my quilt and not just three colours.  So I have chosen green and blue as my darks so to speak.  These are both next to each other on the colour wheel so they will blend well.  I haven't worried that they are lights or darks just that they show blue and green or a mix.  

For my medium I decided to use pinks and yellows, these have two colours between them on the colour wheel and go together well plus they are two colours away from the green.  You could work the opposite way or chose and fabrics like this in a combination you like.


my fabrics from stash

Cutting Instructions

Ok you will need to cut 2" strips from your background fabrics,  I have actually used partial strips as I am busting my stash for this little quilt and I want variety to create movement in my quilt
You will require 288" in length overall

From your dark fabrics cut the same amount of 2" strips plus an extra 36, 2" squares and put these squares aside for next week.
colour wheel
Cutting Instructions

Ok you will need to cut 2" strips from your background fabrics,  I have actually used partial strips as I am busting my stash for this little quilt and I want variety to create movement in my quilt
You will require 288" in length overall

From your dark fabrics cut the same amount of 2" strips plus an extra 36, 2" squares and put these squares aside for next week.


strips ready for piecing
Strips cut and waiting to be paired and sewn.  I lay might out like this, I take a background strip and then I put another coloured strip on top and sew together.  If the fabrics are different sizes I just sew to one is complete and add another as the photos below show you.

let the piecing begin

sewing a 1/4"
Once these are all sewn, take to the pressing board and press with the seams towards the dark fabric. 
Then off to the cutting mat where we sub cut these strips into 2" just like the photo below.  We require a total of 72 (2" X 3.5" strips) of each colour 

Subcutting strips

subcut pairs
Strips all subcut ready for pairing and piecing into four patch blocks.  Don't worry if you have a few extras you may like to use your favourite combination and swap some around later.

ready to make four patches
Now off to the machine to sew these babies together!

final seams happening for this week!
Sew the four patches together using the 1/4" seam.  Remember to make sure you butt your seams to each other so your centre of the block, this will ensure they match nicely.   Just like below. 

unpressed block straight from the machine
After you have sewn your units please go and press them all. They should measure 3.5" now
And you should have a total of 72 four patches. 
Patches to be put away ready for next clue

Clue 1 complete! Yay!
Above you will see the extra squares with the four patches all complete.  Now I would love to see all of your creations.  So remember you can come over toWehago Designs Quilting Community Group on Facebook the or hashtag your photos on Instagram with #wintermystery2016 and follow me on Instagram @wehago.  I also have a Facebook page Wehago Designs and I plan on putting this pattern on my website once we complete the quilt and it will be a free downloadable pattern.

So off you head to the cutting board or the fabric stash and start your creation.

So looking forward to seeing this come together all over the world, and many thanks for coming with me on my quilting journey. 

Have Fun

Wendy

Saturday, 10 January 2015

Happy New Year!


Happy New Year!


I hope everyone has had a wonderful start to the new year!  I have got lots installed and planned for this year.  Many quilting projects and some to share with you and I hope you will share with me also.

Firstly I plan on making a quilt block a week and that will give me 52 blocks to make a quilt or a few next year.  I plan on using scraps from leftover quilts or an extra block of a swap.  So here is my first block it is called Square over squares
Square over squares block

For this block I cut 
1 x 4.5" square, 1x 2.5" square and 1x (2.5 "x 4.5") rectangle of black
1 x 2.5" square and 1 x (2.5" x 4.5") rectangle of red
2 x 2.5" squares and (2 x 2.5 x 4.5") rectangle of black and white

I assemble this in rows by sewing a black rectangle to a black and white rectangle
a black and white square to a red rectangle to a black square
and lastly a white and black square to a red square this piece is then sewn to make a square by sewing the last black and white rectangle to it.  
I then sewed the two top rows and the the squares and then the two halves to form this cool block.


I have joined a group of Australians on Facebook and we are called Pass the Parcel Red, We make a block and then put it in an envelope and send to the next person, they make the same block and then pass on to the next person until the parcel comes back to you with enough blocks to make a quilt.


this is how i plan this quilt to look but it will be scrappy version of this.

My next venture is to continue tutoring this sampler at Palm Beach Quilting and also start tutoring at Gippsbeary Cottage in Korumburra.  I have some new fabric on the way to make a new sampler with a little more variety so I will show you very soon.  This sampler is made with the Hexagon Trim Tool from Creative Grids.  It is such a fun tool and is simple for everyone to use and play with.

Hexagon Trim Tool Sampler 

My other new quilt is this sampler for beginners and anyone who would like to improve their piecing skills.  It will be lots of fun and we will be working on this at Palm Beach Quilting.  Contact Maureen for more information.  If you are interested in coming to class at Gippsberry Cottage contact Trudy to find out more.
Beginners fun Quilt

One of the other exciting things is that I have now joined quiltersblogs.com, I am looking forward to all of the extra readers and would love to know what you think.

I would love to be able to see the blocks that you make so if you would like to post them to 

Any way until next time, 

Happy Quilting and Sewing,

Wendy

Monday, 4 August 2014

Delightful stars quilt along catchup


Just thought I would give you an update, I have been behind on my delightful stars quilt along blocks.  So this last week I have spent more time on them.  I am really pleased how this quilt is coming together as you can see from my mock up.  

I am using an app Sketch Memo lite to do the mock up.  I take photos of my completed blocks and then layer them onto a template in the position they should be.  I then get to look at it easily and it is quite fun doing this.


Here are the blocks I have managed to complete this week, I have managed a few more as well.


Now that all of my blocks are done and I am waiting on the next block instructions I am going to start on the borders.  We have the details of them and tonight I have started cutting.  I am hoping that by the time next weeks lesson is here I will have all of my borders complete so that I will almost be able to start piecing all of the top together.  

I am very excited to be this close to having this top complete.  I will also have two or three other tops complete by the end of next week which I have been working on.

On a great positive today my Facebook page reached over 200 likes.  If you haven't been and liked it please come over and check it out here
I will be running a little competition between here and the Facebook page next week for this little celebration and who knows it may have grown even more by then.

Until next time, enjoy life and hug your family and friends!

Wendy