Showing posts with label 9 Patch. Show all posts

Monday, 15 May 2017

Bakers dozen final piecing instructions

 Hello!  Well I am finally back to complete this top!

I can't believe it has taken so long to come back to you all!

Anyway below is the photo where we left this quilt top

lets get this baby together 
The following are photos of the sections we will deal with

this will be our first section to deal with
We will add the grey strip under the dutch 9 patch but only sew it partially through like in the following photo and then put the small dark grey block on the start of the grey from the left of the block as per the photos

first partial seams
pin these pieces like this ready for the next lot of piecing


then sew these two units together down the completed sashing strip
it will now look like this
You can now add the section below with the 9 patches this to this unit.
We will now continue with the rest of the piecing.
Now we will continue with the partial seams as pinned in above photo 
lets put the following small squares onto the sashing on the following unit as per the photo leaving the seams partially done  so the top square unit will not be sewn fully to the bottom only the top part of the sashing and the bottom one will be sewn to the outer of the piece below the nine patches and fully to the inside of the long sashing.

now we are getting pieces together
Next we will piece the two of these units together and we almost have the top half complete


this will now come together
in a wider view of the units
Now we will piece the house onto the 9 patch and the friendship star piece starting at the small dark grey square and sew down the sashing.


now the house is onto the top part of the quilt

close up of how this will come together
Next we will sew the top part we have just sewn together with the lower section


sew these two pieces together

to look like this
We will now sew the top two pieces together.

we will firstly sew the centre seam down

then the seam above the house
We will now connect the next long section from the bottom to below the house but by the sashing only then we will connect it just below the house

connection of the second last unit of the quilt
lastly we attach the last piece.  I attached the long piece then i did the last partial same from the square near the house.

This is how the lower now looks

Ta Da!  the Bakers Dozen without a border

Flying in the breeze


I decided I wanted a bit of a cool border of this so I have decided to use this text print fabric that has been in my stash.  Now measure your quilt top in the centre of horizontal and vertical plus the ends and sides then take the average and cut your borders to that size and attach them  


text fabric from stash
Now i have cut my side borders and attached these then I have attached the top and bottom borders.

Complete Bakers Dozen Quilt Top!


yay!

Now I am so sorry this has taken so long to complete this post.   I plan on having this quilt top quilted by end of July.  I managed to get to the Australian Quilt Convention and was very pleased to meet the wonderful Angela Walters of the Midnight Quilt show here is a link to her blog.  I did a free motion quilting workshop with her and I am even more motivated now.   

So I hope you are excited to finish.  If you have finished and placed yours another way I would love to see it.  Maybe if you're not in my Facebook group you could tag me on Instagram or even come and join us atWehago Designs Quilting Community

Until next time happy quilting, happy life,

Wendy


Friday, 6 January 2017

9 Patch Update for the Bom Bakers Dozen 2016

 Happy New Year!


Well it has been a bit warm here today!  We reached 36 degs celcius.  My plan was to sew most of the day but I did have to help hubby do a few things outside, so sewing was interrupted.  So I will show you the progress with my final post tomorrow with the top being completed! 


I start by placing all my 9 patches out like this ready for webbing together

I then start sewing them
I take them off the pile from the left and chain piece


progress photo
all blocks webbed and pressed ready to sew into the blocks

some blocks complete
28 blocks complete and pressed
So now these are all done I am very happy.  I have cut all of the hand pieced blocks but yet to cut all of the 28, 9 patch blocks but that should happen tomorrow and these will be all bagged up to do during my lunch time etc at work.  I am very excited to show you the layout I have come up with.  I will be adding a couple of solids for sashing next so I hope you stay tuned and check back in to the blog tomorrow for an update!

I trust you are having a great start to the New Year!  I am hoping to complete about three small quilts this coming week.  I do have the tops done and they just need basting and quilting so lets see how tomorrow and the rest of the week goes.  

Until tomorrow, have a great night or day whichever it maybe on whichever side of the world you maybe,

have a great creative day!


Wendy

Sunday, 18 December 2016

Yippee! December Block of the month and Christmas bonus


Yippee!  December Block is here with a Christmas Bonus


Hello Everyone!

I am finally back.  I have been on a bit of a piecing frenzy with lots going on and I will try and give you another blog tomorrow to fill you in on some of them.  But lets get to business with the Block of the Month.

Firstly I must thank all of you for being so patient and joining in with the Block of the Month this year.  I am excited how this is coming together.  I will be attempting to complete my hand pieced blocks over the next couple of weeks to get that part of this up to date also.

Right what will we need?  6 fabrics this time and some of them not a real lot, so get the box of fabrics you are using and lets get started.

6 Fabrics are required for this months bom
I have designed a house block using a reformed 9 patch block for us to signify going home for Christmas.  I hope you like what I have done. Let me say that although I worked out my measurements on paper I must have had such a blonde moment as today I had to change the roof and the sides.  So here goes.

Cutting List:-

for sky 2 x 3.5" squares 
for the roof on 3.5" x 12.5" rectangle
for door 3.5" x 6.5" rectangles
for walls 3.5" x 9.5"rectangles and 2 x 3.5" squares
for windows 2 x 3.5" squares
and for sides of house 2 x (9.5" x 2")

Please note this is it all laid out before I realised the mistakes I made.  But it will give you an idea of what we are doing.  So please bear with me.


house block laid out but will be adjusted
ready to stitch 
No I would like you to stitch the house body first.  Join the window squares to the wall squares to form 2 rectangles.   Press seams to the walls or downward.  We then join these units to either side of the door and press seams towards the centre of the unit.   Finally we will place the upper part of the house unit on to form the front of the house.

House front all joined
It was right here that I realised my initial calculations I had made the roof to high and the sides to wide.  So our final house block will not have a roof looking like this.  Please attach the sides of the house block either side of the house front then we will do the roof.

For the roof, mark a line diagonally through the centre of your sky squares and lay on either end of the roof rectangle.  Sew directly on this line from corner to corner.  Remember to place your pieces of fabric right sides together   We will then cut the excess fabric off and press the triangle outwards on either end to form the roof.   

Lastly we will sew the roof onto the top of the house front and Voila!  here we are ready to go home for Christmas!  You may wish to add a little button for the door handle and another for a bell or just embroider one on.
house block complete
Now lets look at our 12 blocks together from the past year.   I'm really happy with this, but I do like to play with how I layout a quilt.  So I have been looking at fun ways to do this and I have found one.  Now if you would like to make this quilt into a larger quilt and don't want to add just normal sashing come and make some of our bonus blocks and over the next couple of months I will take you through how I plan to piece this quilt.  I will also catch up on the hand pieced top and continue giving you photos.

Our Twelve Blocks together!

Bonus Block!


Now I did promos a bonus block and for me it is still the humble 9 patch block but this time we will make it only at 6.5".  This is then known as a 6" finished block as that is what it will be in the finished quilt.   I plan to use 28 of these blocks with one other fabric and a plain dark grey solid for some small sashing.  

Cutting list:-

from the various fabrics you have left please cut 2.5" squares and use two fabrics in each consisting of 5 squares of 1 fabric and 4 of the other fabric.  Refer to January 9 patch block, the piecing is the same just the cutting is different
the little humble 9 patch!

Please let me know if you are enjoying this.  I have another planned and am finalising all the details over the next couple of weeks and will let you know about this one.  Due to a few things happening in my personal life with one of my girls becoming engaged I have a few extra things to do so I am planning on doing this when things settle down.  I want to have this all worked out well in advance so that you are all not hanging on a thread for a couple of weeks like which has happened this month.

Also I have come to fine out about this quilt which is going to be put up on the Bernina blog and has been translated from the Netherlands blog.  I am planning to do it so I may learn new skills to enhance my quilt making and sewing.  I figure even just by reading this you may learn a few things about your machines whether they are Berninas or other brands.  I hope you have a read of Sylvia's Crazy Colours Mystery here
Finally many many thanks and I hope you are all having a wonderful time preparing for Christmas and are not too stressed.  I understand this is not always a happy time for everyone but I challenge you to remember a happy moment in time past and hold on to it and relive it in the best possible way you can.

Until my next post.


Have a wonderful day,

Wendy.


Friday, 9 September 2016

September Block of the month!


Happy spring to everyone from my side of the world!  

Well after a few busy weeks, I am finally getting back on track and a bit more organised.  I decided to get this block to you on time.  I have also cut up all of the hand pieced blocks I am behind on and I have them all bagged up so I can just do some hand piecing when waiting or just wanting some quiet time.

So I have decided to introduce you to the Chinese Coin Quilt Block.  


Fabrics I have chosen for both blocks
Go to your stash and find four fabrics, you maybe able to use up some of the scraps that have been made from the previous blocks.

You will need to cut the following
Background cut 2 squares at 5 5/8" then cut diagonally to give you four half square triangles
                           5 squares at 2 7/8"
Fabric A             4 squares at 2 7/8"
Fabric B             4 squares at 2 7/8"
Fabric C             cut 4 squarest at 3 1/4" and then cut diagonally to give you 8 half square triangles

pieces ready to be laid out
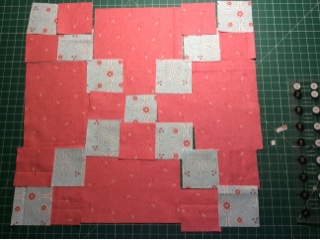
pieces all laid out ready to sew

We will start by sewing the centre squares which form a cross in the middle of the block.  Sew a background to the fabric A and press seam towards fabric A.  Then join the centre background square between a 2 pairs which you have just sewn, this will form the middle strip unit of the block.  
starting of the sewing
Next we will sew the small triangles of fabric C to a square of fabric B and press the fabric towards the triangle.  Then proceed to sew the other small triangle of fabric C to the other side to form the half square triangle as follows.


sew the small triangles onto squares
sewing the small triangles to make the half square triangle

sewn units ready for sewing
Next we will sew the Background half square triangles to the pieced half square triangle units as per the following photos.
sew hst to the pieced half square triangles
all units ready to sew
All pieces are now sewn into units.  we will now join the corner squares to the rectangle units to form three rows of units to make the block.
in rows
Continue sewing and sew the rows together to form a Chinese Coin Block!
completed and pressed block

And here are all of my sewn blocks so far!  I am loving this one.  As I owe you your bonus block I am hoping I can get that out to you all soon.
all 9 blocks so far
I will endeavour to give you another blog post over the weekend.  I have a few little projects and squeals to share with you.  So until then I hope you love this block like I do.  Don't forget to leave a comment and say hello.  I would love to know what your favourite block is so far, so how about that as this months answer as a comment on the blog....which block is your favourite?  For me I think I really love the Greek cross and this Chinese coin along with Puss in Corner.  

So don't be shy,  leave a comment.

Happy Sewing and Happy Weekend!

Wendy.


Tuesday, 12 April 2016

April Bom - hand sewn block

Happy Tuesday to you all!

Today I have finally finished my hand sewn block for this months block of the month to be know as the bakers dozen!

I think you will remember this block from the previous post that I had cut it out but not sewn.
The following is a few photos of the block going together.
First I sewed the four patch units for the corners.
Don't they look fabulous?
Then I attached the top two corners to the centre rectangle to for the top row of the block

I then moved onto the lower part of the block, then to the nine patch which is our theme for this block of the month if you are new to my ramblings.   We are all having lots of fun discovering different nine patches and how we can use them in different settings.  
Once the nine patch centre block was done I attached the side rectangles and then proceeded to attach the bottom and the top to the block.
And Ta Da! Happy dance time!  Just a little note, I do not press my hand sewn blocks until I am about to sew them together, that way I can workout which way to press the seam.   So none of the blocks in this post have been pressed since cutting.   I hope this makes sense to you all.

I then decided it was time to have a looke at these blocks together!   I am loving how this is forming.  Please let me know how you are enjoying it!  This week has lots of big happenings in my life.  So tomorrow I will give you another little blog post with the next couple of quilts or quilt tops that I have made.

I am looking for your help and in return will have a little giveaway so please stay tuned for the announcement.

In the meantime I hope you have had a terrific Tuesday.  Be sure to leave a hello and don't be shy.  Would love to hear what has been coming your way!

Remember to take time and smell the roses and enjoy some creativity in your day.

Wendy