Showing posts with label #Aurifil #Bernina #TulaPink #QuiltModern. Show all posts

Monday, 15 May 2017

Bakers dozen final piecing instructions

 Hello!  Well I am finally back to complete this top!

I can't believe it has taken so long to come back to you all!

Anyway below is the photo where we left this quilt top

lets get this baby together 
The following are photos of the sections we will deal with

this will be our first section to deal with
We will add the grey strip under the dutch 9 patch but only sew it partially through like in the following photo and then put the small dark grey block on the start of the grey from the left of the block as per the photos

first partial seams
pin these pieces like this ready for the next lot of piecing


then sew these two units together down the completed sashing strip
it will now look like this
You can now add the section below with the 9 patches this to this unit.
We will now continue with the rest of the piecing.
Now we will continue with the partial seams as pinned in above photo 
lets put the following small squares onto the sashing on the following unit as per the photo leaving the seams partially done  so the top square unit will not be sewn fully to the bottom only the top part of the sashing and the bottom one will be sewn to the outer of the piece below the nine patches and fully to the inside of the long sashing.

now we are getting pieces together
Next we will piece the two of these units together and we almost have the top half complete


this will now come together
in a wider view of the units
Now we will piece the house onto the 9 patch and the friendship star piece starting at the small dark grey square and sew down the sashing.


now the house is onto the top part of the quilt

close up of how this will come together
Next we will sew the top part we have just sewn together with the lower section


sew these two pieces together

to look like this
We will now sew the top two pieces together.

we will firstly sew the centre seam down

then the seam above the house
We will now connect the next long section from the bottom to below the house but by the sashing only then we will connect it just below the house

connection of the second last unit of the quilt
lastly we attach the last piece.  I attached the long piece then i did the last partial same from the square near the house.

This is how the lower now looks

Ta Da!  the Bakers Dozen without a border

Flying in the breeze


I decided I wanted a bit of a cool border of this so I have decided to use this text print fabric that has been in my stash.  Now measure your quilt top in the centre of horizontal and vertical plus the ends and sides then take the average and cut your borders to that size and attach them  


text fabric from stash
Now i have cut my side borders and attached these then I have attached the top and bottom borders.

Complete Bakers Dozen Quilt Top!


yay!

Now I am so sorry this has taken so long to complete this post.   I plan on having this quilt top quilted by end of July.  I managed to get to the Australian Quilt Convention and was very pleased to meet the wonderful Angela Walters of the Midnight Quilt show here is a link to her blog.  I did a free motion quilting workshop with her and I am even more motivated now.   

So I hope you are excited to finish.  If you have finished and placed yours another way I would love to see it.  Maybe if you're not in my Facebook group you could tag me on Instagram or even come and join us atWehago Designs Quilting Community

Until next time happy quilting, happy life,

Wendy


Tuesday, 10 January 2017

Part 1- lets piece the blocks the Bakers Dozen Square Dance!

Hello!

How did you all like the Bom quilt which I have called the Bakers Dozen Square Dance?


Now I will give you a break down of the strips for sashing and how I joined it all together.  Please don't be overwhelmed.  It looks complicated, but let me reassure you, that it is not really hard, we just need to take our time and do this in an order.
 (If you do not wish to set it out like this you could sash in uniform way and use the extra 9 patches to make the border with)

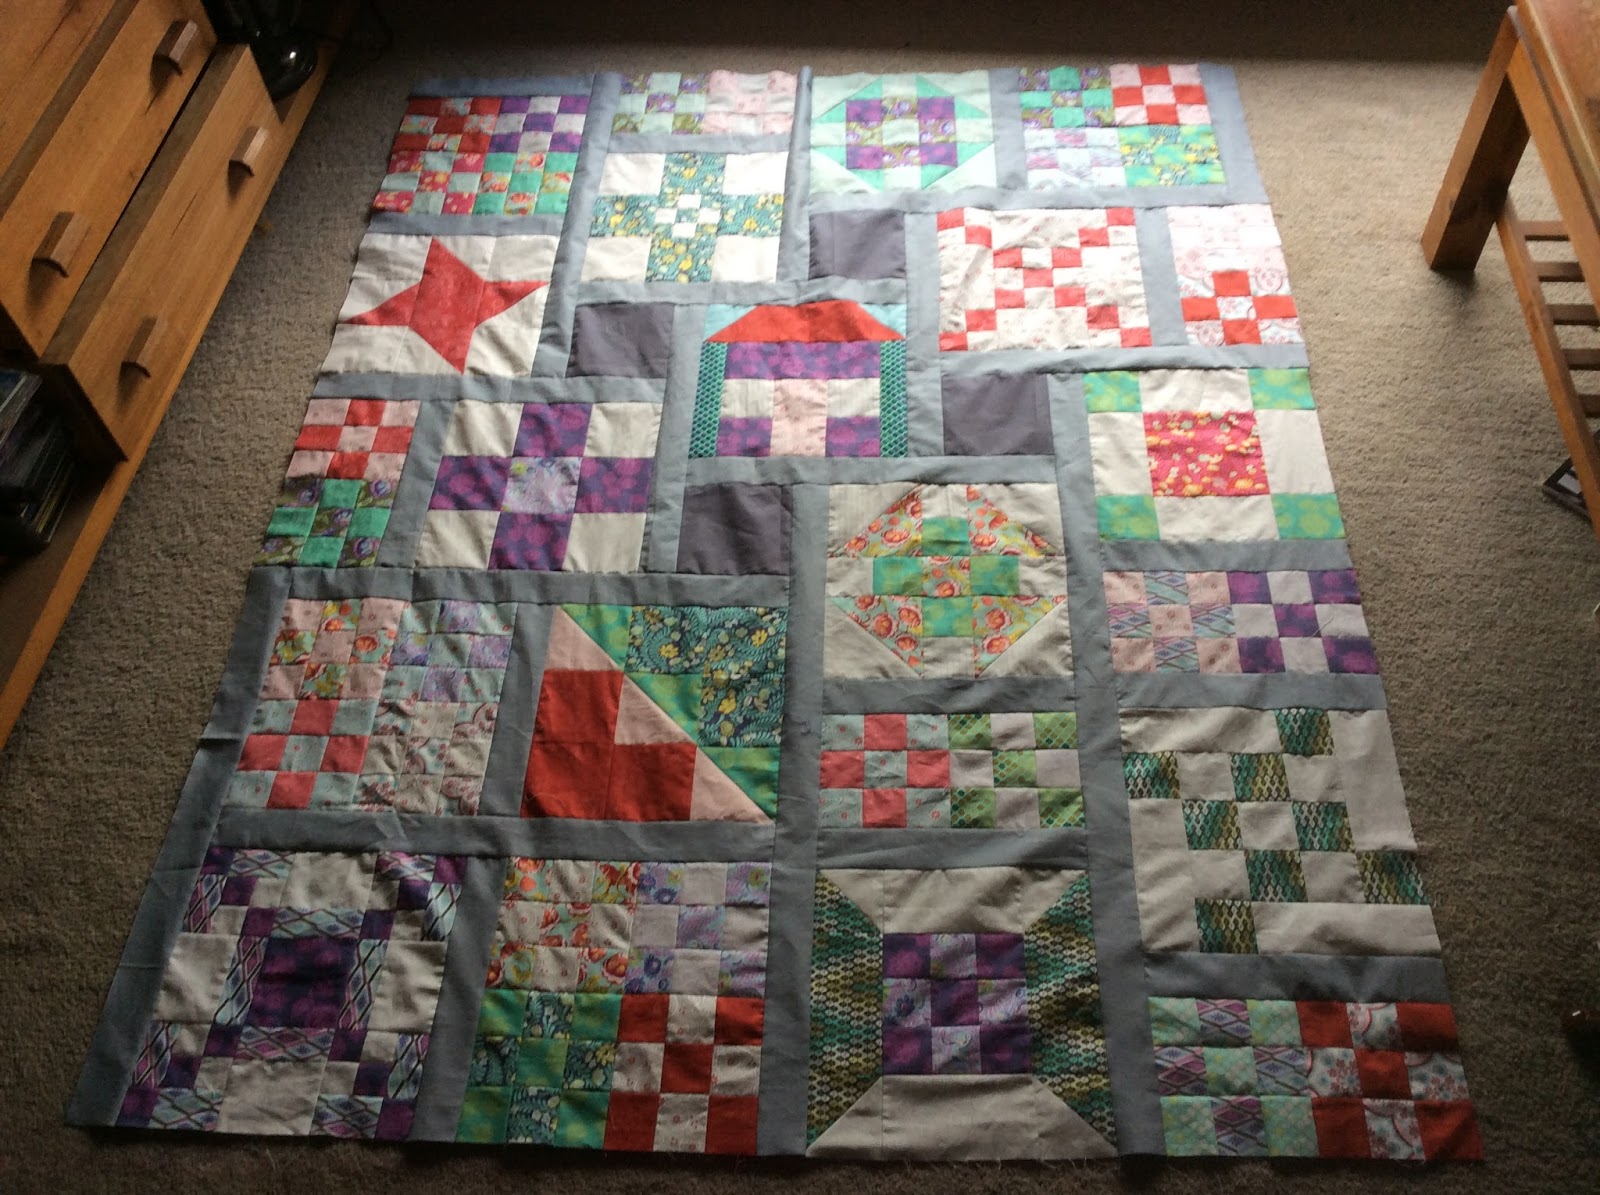
I did lay this all out and move the blocks several times to achieve the right effect (with hubbies help) of my blocks and colours.   I suggest you place the house block central as I have, why?  I feel this draws the eye to the centre of the quilt then allows our  eyes drift around all of our other blocks.  It's a bit like the saying all roads lead to home.

You need to join the extra 9 patches made from the December blog as follows to form 4 x 12.5" square blocks and 6 12.5" x 6.5" rectangle blocks.  These are fillers.  

For the sashing strips cut 2.5" width of fabric.  We need 25 strips to make the sashing and the inner border.  Cut the following from the light grey border (or whichever colour you prefer)
1 x 42.5" length
1 x 34.5"
2 x 28.5"
3 x 26.5"
7 x 20.5"
Using some of the ends from the previous strips and some of the other strips cut
14 x 12.5"

then you should have 7 strips which can be used for the inner border.

From the dark grey fabric cut  4 x 6.5" squares

We can now start to assemble the quilt.  Clear a space or use a design wall.  I use a floor as I haven't set up my design wall.

this was my initial layout before I moved the house and played with all of the 9 patches
I have labeled the sections and will explain each one in the following steps


Join the following Sections with a 12.5" strip.  

note:- *Press all seams towards the sashing!

Firstly do section A, B, C, D, E, F, G, placing a 12.5" strip between the monthly Bom and the little 9 patch fillers.

Onto section F place an extra 12.5" strip on the outside of the 9 patch fillers

Secondarily, do section I and J making these into long pieces as in the picture.


this is a quick overview of this section which we will piece together soon

Ok our next part of completing this top is to piece some of these sections together.  So on the top of A and B we will sew a 20.5" strip,  then sew both of these pieces together. Then to the left outside of this unit we sew the 28.5".  Place this piece away for later
this is section A and B now know as AB
Next sew the 20.5" to C, E, F and G.

 Sew the 34.5" strip to inner part of section I as per the photo
Sew the 42.5" strip to the inner part of J as per the photo

overview of all the sections joined into units to make the complete top
Now your top should be looking a bit like this.  I have separated them all so you can get the idea of how all of the units are coming together.


top section of quilt.  
Now this will end our Part one.  The next section we will deal with the partial seams and the final part of the border.  If you wish you may like to cut your border out.  I cut my strips at 5.75" width of fabric.  I used 8 strips as to do this.  I plan on giving you part 2 for the final part of this process by Friday so you can all do a lot over the weekend as I know a lot of you put your weekends away to quilt the days away.   I am trying to find time to write this as clear as I can after work so I feel this is the best solution for us all.

Please let me know how you are all finding this challenge.  Remember I will be doing a row by row this year but feel I should wait until April to start.  I really need to complete a few things and this will give me time to get a fair amount of it together in writing anyway.   

So I wish you all the very best for this week and enjoy piecing this part of the quilt together.  Plus remember this is your quilt so you may piece it a standard piecing of sashing or just join them as they are if that is how you wish to do it.  

have a good creative week,

Wendy.

Lets do a Happy Dancing with the Penguins!


Monday, 9 January 2017

Bakers Dozen Square Dance! - BOM 2016 Reveal!


Bakers Dozen Square Dance!


Well It is together!  Thanks to all who have played along this year!  I have been called into work a day early so I will give you the reveal now and let you get your sashing and border fabric out and cut into strips.   

Tonight I will give you the breakdown and how to get this together.


all of our blocks   
Now you will remember the spit 9 patch, it was bothering me, so I went and made a new one
redone block!
Now I was happy with this result so I replaced it in the mix!


before the replacement of the split 9 patch

starting of arranging of the blocks

final arrangement of the blocks in the quilt
Finally together just before the setting sun, so outside to get a photo for you all of it hanging on the line without the borders!

together without boxers
Then after a little bit of work during the night and some sleep, a quick photo before going to work of the top outside on the line with the borders this time!

Ta Da!

Bakers Dozen Square Dance Quilt!

You will need 1.35 mts or 1.5 yds of light grey for sashing, 8" strip of dark grey and 1.2 mts or 1 1/3 and a little bit for the outside border.

well I must bid you good bye and get to work on time!  you may cut your light grey into 2.5" strips and you will need 21 strips for the sashing.  

Our quilt measures 71.5" x 85"  and I can't wait to get it all quilted.

Until tonight have a great day 

Wendy.  
ps don't forget to leave a comment!  :)


Friday, 6 January 2017

9 Patch Update for the Bom Bakers Dozen 2016

 Happy New Year!


Well it has been a bit warm here today!  We reached 36 degs celcius.  My plan was to sew most of the day but I did have to help hubby do a few things outside, so sewing was interrupted.  So I will show you the progress with my final post tomorrow with the top being completed! 


I start by placing all my 9 patches out like this ready for webbing together

I then start sewing them
I take them off the pile from the left and chain piece


progress photo
all blocks webbed and pressed ready to sew into the blocks

some blocks complete
28 blocks complete and pressed
So now these are all done I am very happy.  I have cut all of the hand pieced blocks but yet to cut all of the 28, 9 patch blocks but that should happen tomorrow and these will be all bagged up to do during my lunch time etc at work.  I am very excited to show you the layout I have come up with.  I will be adding a couple of solids for sashing next so I hope you stay tuned and check back in to the blog tomorrow for an update!

I trust you are having a great start to the New Year!  I am hoping to complete about three small quilts this coming week.  I do have the tops done and they just need basting and quilting so lets see how tomorrow and the rest of the week goes.  

Until tomorrow, have a great night or day whichever it maybe on whichever side of the world you maybe,

have a great creative day!


Wendy

Sunday, 18 December 2016

Yippee! December Block of the month and Christmas bonus


Yippee!  December Block is here with a Christmas Bonus


Hello Everyone!

I am finally back.  I have been on a bit of a piecing frenzy with lots going on and I will try and give you another blog tomorrow to fill you in on some of them.  But lets get to business with the Block of the Month.

Firstly I must thank all of you for being so patient and joining in with the Block of the Month this year.  I am excited how this is coming together.  I will be attempting to complete my hand pieced blocks over the next couple of weeks to get that part of this up to date also.

Right what will we need?  6 fabrics this time and some of them not a real lot, so get the box of fabrics you are using and lets get started.

6 Fabrics are required for this months bom
I have designed a house block using a reformed 9 patch block for us to signify going home for Christmas.  I hope you like what I have done. Let me say that although I worked out my measurements on paper I must have had such a blonde moment as today I had to change the roof and the sides.  So here goes.

Cutting List:-

for sky 2 x 3.5" squares 
for the roof on 3.5" x 12.5" rectangle
for door 3.5" x 6.5" rectangles
for walls 3.5" x 9.5"rectangles and 2 x 3.5" squares
for windows 2 x 3.5" squares
and for sides of house 2 x (9.5" x 2")

Please note this is it all laid out before I realised the mistakes I made.  But it will give you an idea of what we are doing.  So please bear with me.


house block laid out but will be adjusted
ready to stitch 
No I would like you to stitch the house body first.  Join the window squares to the wall squares to form 2 rectangles.   Press seams to the walls or downward.  We then join these units to either side of the door and press seams towards the centre of the unit.   Finally we will place the upper part of the house unit on to form the front of the house.

House front all joined
It was right here that I realised my initial calculations I had made the roof to high and the sides to wide.  So our final house block will not have a roof looking like this.  Please attach the sides of the house block either side of the house front then we will do the roof.

For the roof, mark a line diagonally through the centre of your sky squares and lay on either end of the roof rectangle.  Sew directly on this line from corner to corner.  Remember to place your pieces of fabric right sides together   We will then cut the excess fabric off and press the triangle outwards on either end to form the roof.   

Lastly we will sew the roof onto the top of the house front and Voila!  here we are ready to go home for Christmas!  You may wish to add a little button for the door handle and another for a bell or just embroider one on.
house block complete
Now lets look at our 12 blocks together from the past year.   I'm really happy with this, but I do like to play with how I layout a quilt.  So I have been looking at fun ways to do this and I have found one.  Now if you would like to make this quilt into a larger quilt and don't want to add just normal sashing come and make some of our bonus blocks and over the next couple of months I will take you through how I plan to piece this quilt.  I will also catch up on the hand pieced top and continue giving you photos.

Our Twelve Blocks together!

Bonus Block!


Now I did promos a bonus block and for me it is still the humble 9 patch block but this time we will make it only at 6.5".  This is then known as a 6" finished block as that is what it will be in the finished quilt.   I plan to use 28 of these blocks with one other fabric and a plain dark grey solid for some small sashing.  

Cutting list:-

from the various fabrics you have left please cut 2.5" squares and use two fabrics in each consisting of 5 squares of 1 fabric and 4 of the other fabric.  Refer to January 9 patch block, the piecing is the same just the cutting is different
the little humble 9 patch!

Please let me know if you are enjoying this.  I have another planned and am finalising all the details over the next couple of weeks and will let you know about this one.  Due to a few things happening in my personal life with one of my girls becoming engaged I have a few extra things to do so I am planning on doing this when things settle down.  I want to have this all worked out well in advance so that you are all not hanging on a thread for a couple of weeks like which has happened this month.

Also I have come to fine out about this quilt which is going to be put up on the Bernina blog and has been translated from the Netherlands blog.  I am planning to do it so I may learn new skills to enhance my quilt making and sewing.  I figure even just by reading this you may learn a few things about your machines whether they are Berninas or other brands.  I hope you have a read of Sylvia's Crazy Colours Mystery here
Finally many many thanks and I hope you are all having a wonderful time preparing for Christmas and are not too stressed.  I understand this is not always a happy time for everyone but I challenge you to remember a happy moment in time past and hold on to it and relive it in the best possible way you can.

Until my next post.


Have a wonderful day,

Wendy.