Tuesday, 9 February 2016

February block of the month!

February Block of the Month is Here!

Today is a very special person in my life birthday so a big Happy Birthday to Margie Burke!

I hope you all are enjoying making this with me!   Today I chosen three fabrics from my bundle, and once again I will make one by machine and one by hand.  I will update this blog post with the one  hand pieced block later in the week.   I have been struggling to finish my quilt and have an ongoing minor health issue I am dealing with this week.

Ok, lets do this!  From our three fabrics I have chosen a dark, medium, and light fabric.  I have also fussy cut the centre a little bit of the hand pieced one you may like to do this if you have a print which would look better centred.  

cutting instructions:- 

Centre 1 x 6.5" square ,  Cornerstones 4 x 3.5" squares, and rails 4 x (3.5" x 6.5")


colours for each block
Cut and laid out ready for stitching

Cut and ready for marking before stitching
We stitch this the same way as our previous nine patch in the rows and then join the rows, taking care of nesting our seams.  Make sure you press your seams to the darker fabric.

top row being stitched

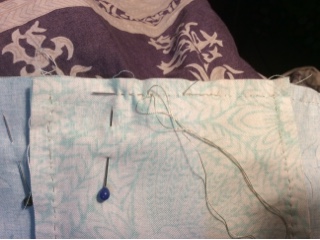
Centre being sewn

Top and Centre rows together


Complete Uneven 9 patch!
I look forward to seeing your blocks posted either in the Facebook page or on instagram!  If you missed last months Block of the month click here

So until next time have lots of fun,

Wendy


Sunday, 7 February 2016

Marking your quilt with a Hera marker!

Well firstly I would love to thank Sew and Sow Farm for hosting this monthly link up with tips and tutorials.  I always say I should do them and find myself becoming busy, well this is making me try and do one a month for you.

Today I would like to talk to you about one method I have for marking my quilts.  One of the main ones is with a Hera Marker and because I am using it at the moment I thought it appropriate I show you how I do this.

Hera Marker with my template with my Aurifil 12 wt thread in background

A box hubby gave me and this makes this task possible whilst the quilt is on the frame

So how does this work, firstly I place my template where I want to draw the line

template in position
next I hold the wooden box on my knees under where I want to mark the line.  This gives a strong and hard surface for me to press the marker onto the quilt

drawing with the Hera Marker

a better angle for you to see
The Hera marker leaves creases in your fabric, no worries about getting marks out later.

creases in the top after marking
Sometimes you may need to adjust your light to get the shadowing effect to see the line but this is not a problem
Here is a few stitches on the needle
And here is a cool photo of a few blocks already quilted.  I love this marker and I am sure you will also.  I am really grateful that the fat quarter shop are on board with link which is being hosted by Sew and Sow Farm.  If you are interested in the Hera marker you can check out one here at the here at the fat quarter shop, and also a big thank you to Aurifil my favourite thread for sewing and quilting


few blocks quilted
This is a book I purchased a few years ago, it is invaluable to me.  This version is not available now but there is a newer version out which is just as good.  If you want ideas on quilting this is ideal, it is good for both hand and machine quilting.
a great book
I hope this has answered some of your questions regarding marking your quilts.

Be on the lookout for my Block of the Month post this week and I look forward to seeing all of your February blocks.  I will do a little post of your blocks also this week, it will be great to see them all together.

So until then, happy creating,

Wendy.

Saturday, 6 February 2016

Bushman's city visits

Hello Everyone!

I seem to have been missing in action!  Unfortunately the last quilt I have just finished you will have to wait about three weeks before I can possibly show you.  All I can say is I am excited.

This week looks like it will be a binding week for my three finishes for this year!  Whoop whoop! and a Whoomp!

But lets see what the main concentration is on at the moment!  I am loving this range and it is Melba from Emma Jean Jansen!  If you do not know who she is, take a look at her website, Im sure you will agree she is a wonderful Australian designer and her fabric ranges are superb, just take a look!

Bushman City Visits Quilt
I have designed this pattern last year and it was using a flower range and I wanted to try it with some of our wonderful Australian flowers.  The block I designed I have named Rhonda's love, dedicated to a loving quilting friend who left this earth last year.
The Pattern for this quilt will be available as a PDF download or as a booklet later this month on my new and upcoming website!  I am so excited with the little things I will be offering to everyone


close up of the quilting design 
I decided that this quilt needed some curves added in so with a bit of a twist I opted for a spiral, in each block and it is giving the whole quilt a wonderful look.  I am using Aurifil 12 wt thread and a small Shashiko needle for the hand quilting.

here is the quilt after a few rows were completed.
another close up of the work with my trusty clover adjustable thimble
At this stage it looks like this quilt will be taken off the frame on Monday some stage.  The latest will be Tuesday.  I am then planning on binding these two and finishing some background quilting on another before binding.   My quilting area also needs a new tidy and reorganisation for the coming year.  I have found these really cool containers that fit perfectly in my shelves around my sewing table that hubby made.  So next week I will take before and after photos for you.   I will also reveal a few fabrics that will be cut up during the year and made into more quilt tops to come to life.
New fabric brings excitement
I am showing you my latest fabric to the stash.  It is this years Kona colour of the year called Highlight.  Its just an awesome yellow and I can't wait to start to put together the top with these lovely charm packs by Moda:- LOL by Me and My Sister Designs
                                                  Dot Dot Dash by Me and My Sister Designs
                                                  Sanibel by Gina Martin
                                                  Moxi by Studio M
This was a challenge from Molli Sparkles on his Sunday Stash Blog so I couldn't resist showing you all.

Please go and check out the following blogs and the other blogs linked to them for lots of eye candy.  I am linking with Molli Sparkles Sunday Stash
                            Sarah from Confessions from a Fabric Addict
                            Zenia Rene from A Quilted Passion
I would love to give a huge thank you to these bloggers for their time and their linky parties.  It is such fun to see what everyone else is doing.

Oh just a reminder that my Block of the Month no 2 will be out next week, and incase you missed no 1 have a look at it here.

Now until my next blog continue to have a wonderful quilty or creative time,

Wendy


Friday, 15 January 2016

It's a weekly wrap! Whoop Whoop!

Happy Friday all and everyone!

A massive thank you to all of you wonderful people who have started following my blog and for joining with me with my Block of the Month this year! #WDBOM2016

If you haven't read about it Please do here, we are having lots of fun

Now since I announce the block of the month, parts of our country have been going through terrible bushfires and many have lost their homes.  One kind soul has started making little quilts and she is using the 9 patch blocks that we are doing this month,  so many of the people doing my BOM are enjoying it so much they are making a few extra blocks for fun and sending them to Shari.  If you would like to help here is the link to A hug from a stranger there is also a need for backings and wadding and thread for quilting so if you can help with only support it would be greatly appreciated.

Firstly I am on the final stretch of this quilt which has been in the workings for a bit over a year!  
Sorry only a sneak peak until it can be finally revealed.  But let's put it this way I'm doing a happy dance! I am loving the finishing stages!


Today I spent helping my mum make this cute little tote.  My mum is 89 and one of her GrandDaughters gave her a little stitchery which was to be made into a tiny cushion but we decided a cute bag for mum was in order.  I have just got back from entering this and some other things of mums and mine in our local show for tomorrow.

We will go for a visit to see lots of lovely arts and crafts and to catch up with several people.  
Looking forward to having a good time there.  


Oh and a little weird selfie of my new glasses, it's great to be able to see properly again!  Doing a Whoop Whoop for them! And they are lovely cool glasses not boring and conservative like I normally take.  


And this little baby quilt is for the  Very snuggly quilt program . Ido the machine quilting on some of the smaller ones to practice and become better at my machine quilting.  Oh and did I mention it's lots of fun!


And look at these lovely charms that are on their way to me from my friend Kathi, you might like to check out her Blog and all the wonders she has been doing   I can't wait to see these in person and be able to start my fun project with them!  Stay tuned to see how they are going to be used!  It will be heaps of fun to be sure.


So I hope you have had a wonderful week like me, and until the next post. Have fun quilting or creating and be sure to go over and read about all the Whoop whoop at confessions of a fabric addict! And also A quilted passion  I love linking with her when I get the time!

all the very best for today and the weekend,

Wendy


Friday, 8 January 2016

January - Block of the Month is here!


Its Here!


Let me firstly explain why I have chosen the 8th to release this BOM first block to you all.  

On this day in 1919 my father was born, he left this world nearly 11 years ago.  Whilst I miss him daily, I look around and smile at all of the little anecdotes and quips he has left me with and it makes me remember all the times we had with great fondness.

So now lets get to the BOM!

I have decided to do one of the most traditional blocks known and one that everyone can achieve great results and on its own it makes a wonderful quilt.  I am talking about the 9 patch block.  I was traditionally made with 5 dark colours and 4 light colours or vice versa.  

This block was made as it was portable, quick and made up into wonderful quilts for the people moving west.  Talking about moving, I thought we would take a journey with this block as see what we can create keeping this block in mind.  The 9 patch is the common link in this BOM but we will look at lots that have derived from it and make them.  For this the first one you may wish to make one  keeping it neutral so that later on we can add appliqué on it saying BOM 2016.

So lets look at what we need.  Now you know your block you can decide on the fabrics you will use.  You can also decide to do this on machine or by hand.  I have done both.  I have made the blocks 12" finish so after they are sewn here they will measure 12.5" leaving the .5" for the seam allowance when sewing into a quilt.


both machine and hand pieced blocks


final layout for machine pieced
layout for hand piecing block
For your block you will need to cut out 9 pieces each at 4.5"  decide if you want to use only two or three colours.  You can play with the colours as I have done to see what you like best.  If you want to test your lights and darks change your photos to black and white mode.
 -firstly lets look at the machine pieced block:-
  
layout your block and take to the machine this way you know which pieces need to be sewn to what, do each row


1/4" foot fitted and ready
make the stitch length a bit smaller

quarter inch being sewn

see the quarter inch seam
chain piecing


one row sewn
Press your seams to the dark side read to sew the rows together

making sure you nest your seams
Then sew the rows together taking care to nest the seams

how nested seams should look

final block

wrong side of block 
now for the hand piecing block.  I have used my rotary cutter to cut the 4.5" blocks and I have use the perfect piecer by Jinny Beyer to mark dots for my quarter inch seam allowance, you might like to make a template or even just use a 1/4 ruler to mark you sewing line

I only drew on five of the block unit pieces

Marked ready for sewing

ready for sewing
Pin pieces 


start sewing at the first dot or the intersection of your lines


do a running stitch along the 1/4'

progressing along

one seam sewn
two seams sewn


sewing the rows together

coming to  the junction of the seams

sewing through the seams


completed block unpressed

Remember to check that your block measures 12.5'   this will help later if it is out your quarter inch is either out or your cutting.  

Now let the fun begin, please if I have left anything out just ask, and be sure to post this on the Wehago Designs Quilting Community Facebook group or on Instagram with a #WDBOM2016,  I look forward to doing all of the variations of this block with you and building on the skills you have.  I am so excited to see everyones creations.  Remember if you do not want to make a whole quilt of them just make a placemat or a bag, even a table runner.   All I suggest is we have fun and create together.

Ok everyone, lets go and have some quilt stash fun!

Waiting on you blocks,

Wendy.